
I haven’t posted anything in a while. A lot has gone on in the last year – a new house, a wedding (yes, mine!), a promotion and I’ve fallen behind on the blog. So what’s causing me to post again? This DIY was too good not to share.


1. $100-$300 depending on the square feet of countertop you’re looking to cover, and depending on the amount of supplies you are going to need to buy (some of you may already have brushes, craft paint, and/or buckets).
2. A full weekend or split the project into a few hours per day for about a week 🙂
3. Skill with taping and prepping your work area
4. Some sort of primer ( all surface)
5. Your design paints/tools (we’ll get more into this later)
6. Your high gloss sealant of choice. We went with Envirotex Lite which is a water clear reactive polymer compound. It cures to a thick, glossy coating in about 8 hours at 70°F, and reaches full strength and toughness in about 48 hours. As the company states, it’s a durable, resilient material and requires no polishing to produce a high gloss. What’s even better is that it usually only takes one coat to achieve your finish!
7. PATIENCE. You have to let the beautiful shiny top coat cure for quite some time… I read all different advice on the appropriate time to let it cure. In my experience it was dry to touch in 24-48 hours, but I didn’t actually set anything back on the countertops for about a week to ensure it was hardened and leveled. After a week I even set my Kitchen Aid Mixer on the countertops (which is heavy) and had no problems.
Still with me?? Do you want to see this afterwards?!

Okay, then here’s the supplies I chose to achieve the gorgeous white granite look I was going for:
![]()
1. Sandpaper to rough up the existing countertop before applying the primer. Honestly, I didn’t use it too much just a light ‘roughing’ – so you may be able to skip it depending on the type of countertop you’re starting with, I think ours was some lame linoleum in cream/white.
2. Plastic Tarp. Buy it in bulk. Even if you’re an expert at painting and don’t get paint outside your project area you will need the tarps to catch the dripping Envirotex off the sides of the countertops — and the whole point is to let it drip over. That’s how it self levels and covers the edges.
3. Cheap work gloves – you don’t want the Envirotex Lite on your hands.
4. Metallic Leaf – optional, but I’d suggest it. Do research on the type of granite you’re shooting for – a lot of the high end granites have metallic flakes in them and some glitter.
5. Fine Glitter – see above. I went with a pearlescent sheen white glitter – please use a fine glitter and not a course chunky one which may make your countertops look more like a 2nd grade art project.
6. Foam brushes. I’d read on a few blogs that you can use these to spread the Envirotex or to paint your edges but they were so cheap I really stuck to options # and wouldn’t recommend them. Actually my favorite spreading tools ended up being the 99cent plastic spreader things in the paint section so scoop up a few of these if you see them!
7. Natural Sponges. Buy a bunch! These are what you’re going to use to create the granite patterns – look for different shapes and sizes.
8. Painters Tape. Keeps your edges clean and holds your plastic tarps in place.
9. Paint brushes and tray for the primer. Really use whatever type you like – I wanted a very smooth look so I got cabinet/door foam rollers in two sizes and used a Purdy small angle brush for edges and corners.
10. Plastic containers/pitchers. This is to mix your Envirotex Lite and then to pour over your counter tops. You’re going to need a couple so you can keep mixing while one person is pouring! Unless you’re working with a very small area… which we were not.
11. Craft Paints. Seriously — that’s what you use. Cheap, Acryllic craft paints from your local craft store like a Michaels or Hobby Lobby. Try to pick colors that match the example granite you’re going for! We used White, metallic silver, black, and a tan.
12. Some sort of primer ( all surface). I used a warm gray color, and honestly it’s smart to go a little dark on this first layer it’ll just spot through and add depth to your granite pattern.
13. Envirotex Lite. We bought 8 of the two bottle 2sq. ft. kits and used 6 for our kitchen, looking back at it I wished I’d used a little more up front but I was so nervous we’d run out! It covers pretty much exactly like the bottle and website say so just trust the Professional Tips.
14. A Partner (not pictured). The beginning and prep work you can tackle yourself but a friend really comes in handy for the Envirotex part at the end!
Okay, still with me? You’re going to start by prepping your work area. Clear everything off the countertops!! And snap a nice ‘Before’ photo – so you can do the comparison once you’re done and give yourself an amazing pat on the back. Or three. Here are our before shots:


By now you should’ve already researched the type of granite you were looking for and know what you’re trying for. Take out your natural sponges, acrylic paint colors, and paper plates. I squirted out my paints on the paper plates and got going with my first coat!

For the first (major) coat I used a white and a metallic light silver. Honestly, the hubs picked the light silver and I was shocked. I’m usually the glitter fiend… and he was so right! The one metallic paint pick thrown in with the other acrylic paint on the sponge added depth. He nailed it.


And this is going to be the difficult part for you. If you did the first coat right it’s going to look pretty good at this point, and your husband may even try to talk you out of the next step “don’t push your luck!!” but push your luck. The next few layers are what make it so realistic. I won’t lie to you, it’s going to look WORSE next before it gets better. That’s because the next step is to add your accent colors. It kinda ends up looking spotted, like a funky Dalmatian… I really don’t know else how to explain so… here’s kinda what mine started looking like:


OMG I know — but I warned you!!!! Just be patient…. you still have another layer to go!
Alright, then once it dries you continue with the FINAL LAYER of acrylic paint. We ended up spanning this work over several nights during the week. I’d get home from work, do a quick layer of acrylic, and we’d eat dinner etc. It dries pretty quickly so you could probably knock it all out in a few hours but I was doing my best not to rush the project. The final layer should be a majority of the color you want to be your main color of granite. I went back to the white and metallic light silver combo.


I ended up using the ‘depth’ spots to decide where to apply my silver leaf. After the final layer of paint is dry, take some tweezers and apply flakes of the silver leaf down in various areas of the granite. There’s not really a right or wrong way to do this, go back to the photos you saved of your ‘wish list’ granite and see how the metallic flake shows through. I tried to focus on adding 1-2 small leafs of silver in the ‘deep’ areas of my pattern.
Once you finish laying out all the metallic leaf pieces to your liking you’re ready to go with the BEST step – the shiny sealant!
After reading about several options to seal your countertops I was sold on the Envirotex Lite even though its application sounded a little demanding because let’s just be honest – the results are unreal y’all. Make sure both you and your partner have read the tips on the website for how to apply and that you’ve read through a couple of blog tutorials and watched a YouTube video or two and you should be good to go! I really liked this tutorial where they even detail using a blow torch to knock out any air bubbles that may form during application. I did not use a blow torch myself, but we did invest it a little Crème Brule torch like this:

It did the trick perfectly and I wasn’t worried about burning/scalding anything.
I also liked the detail in this post and they used Envirotex Lite as well.
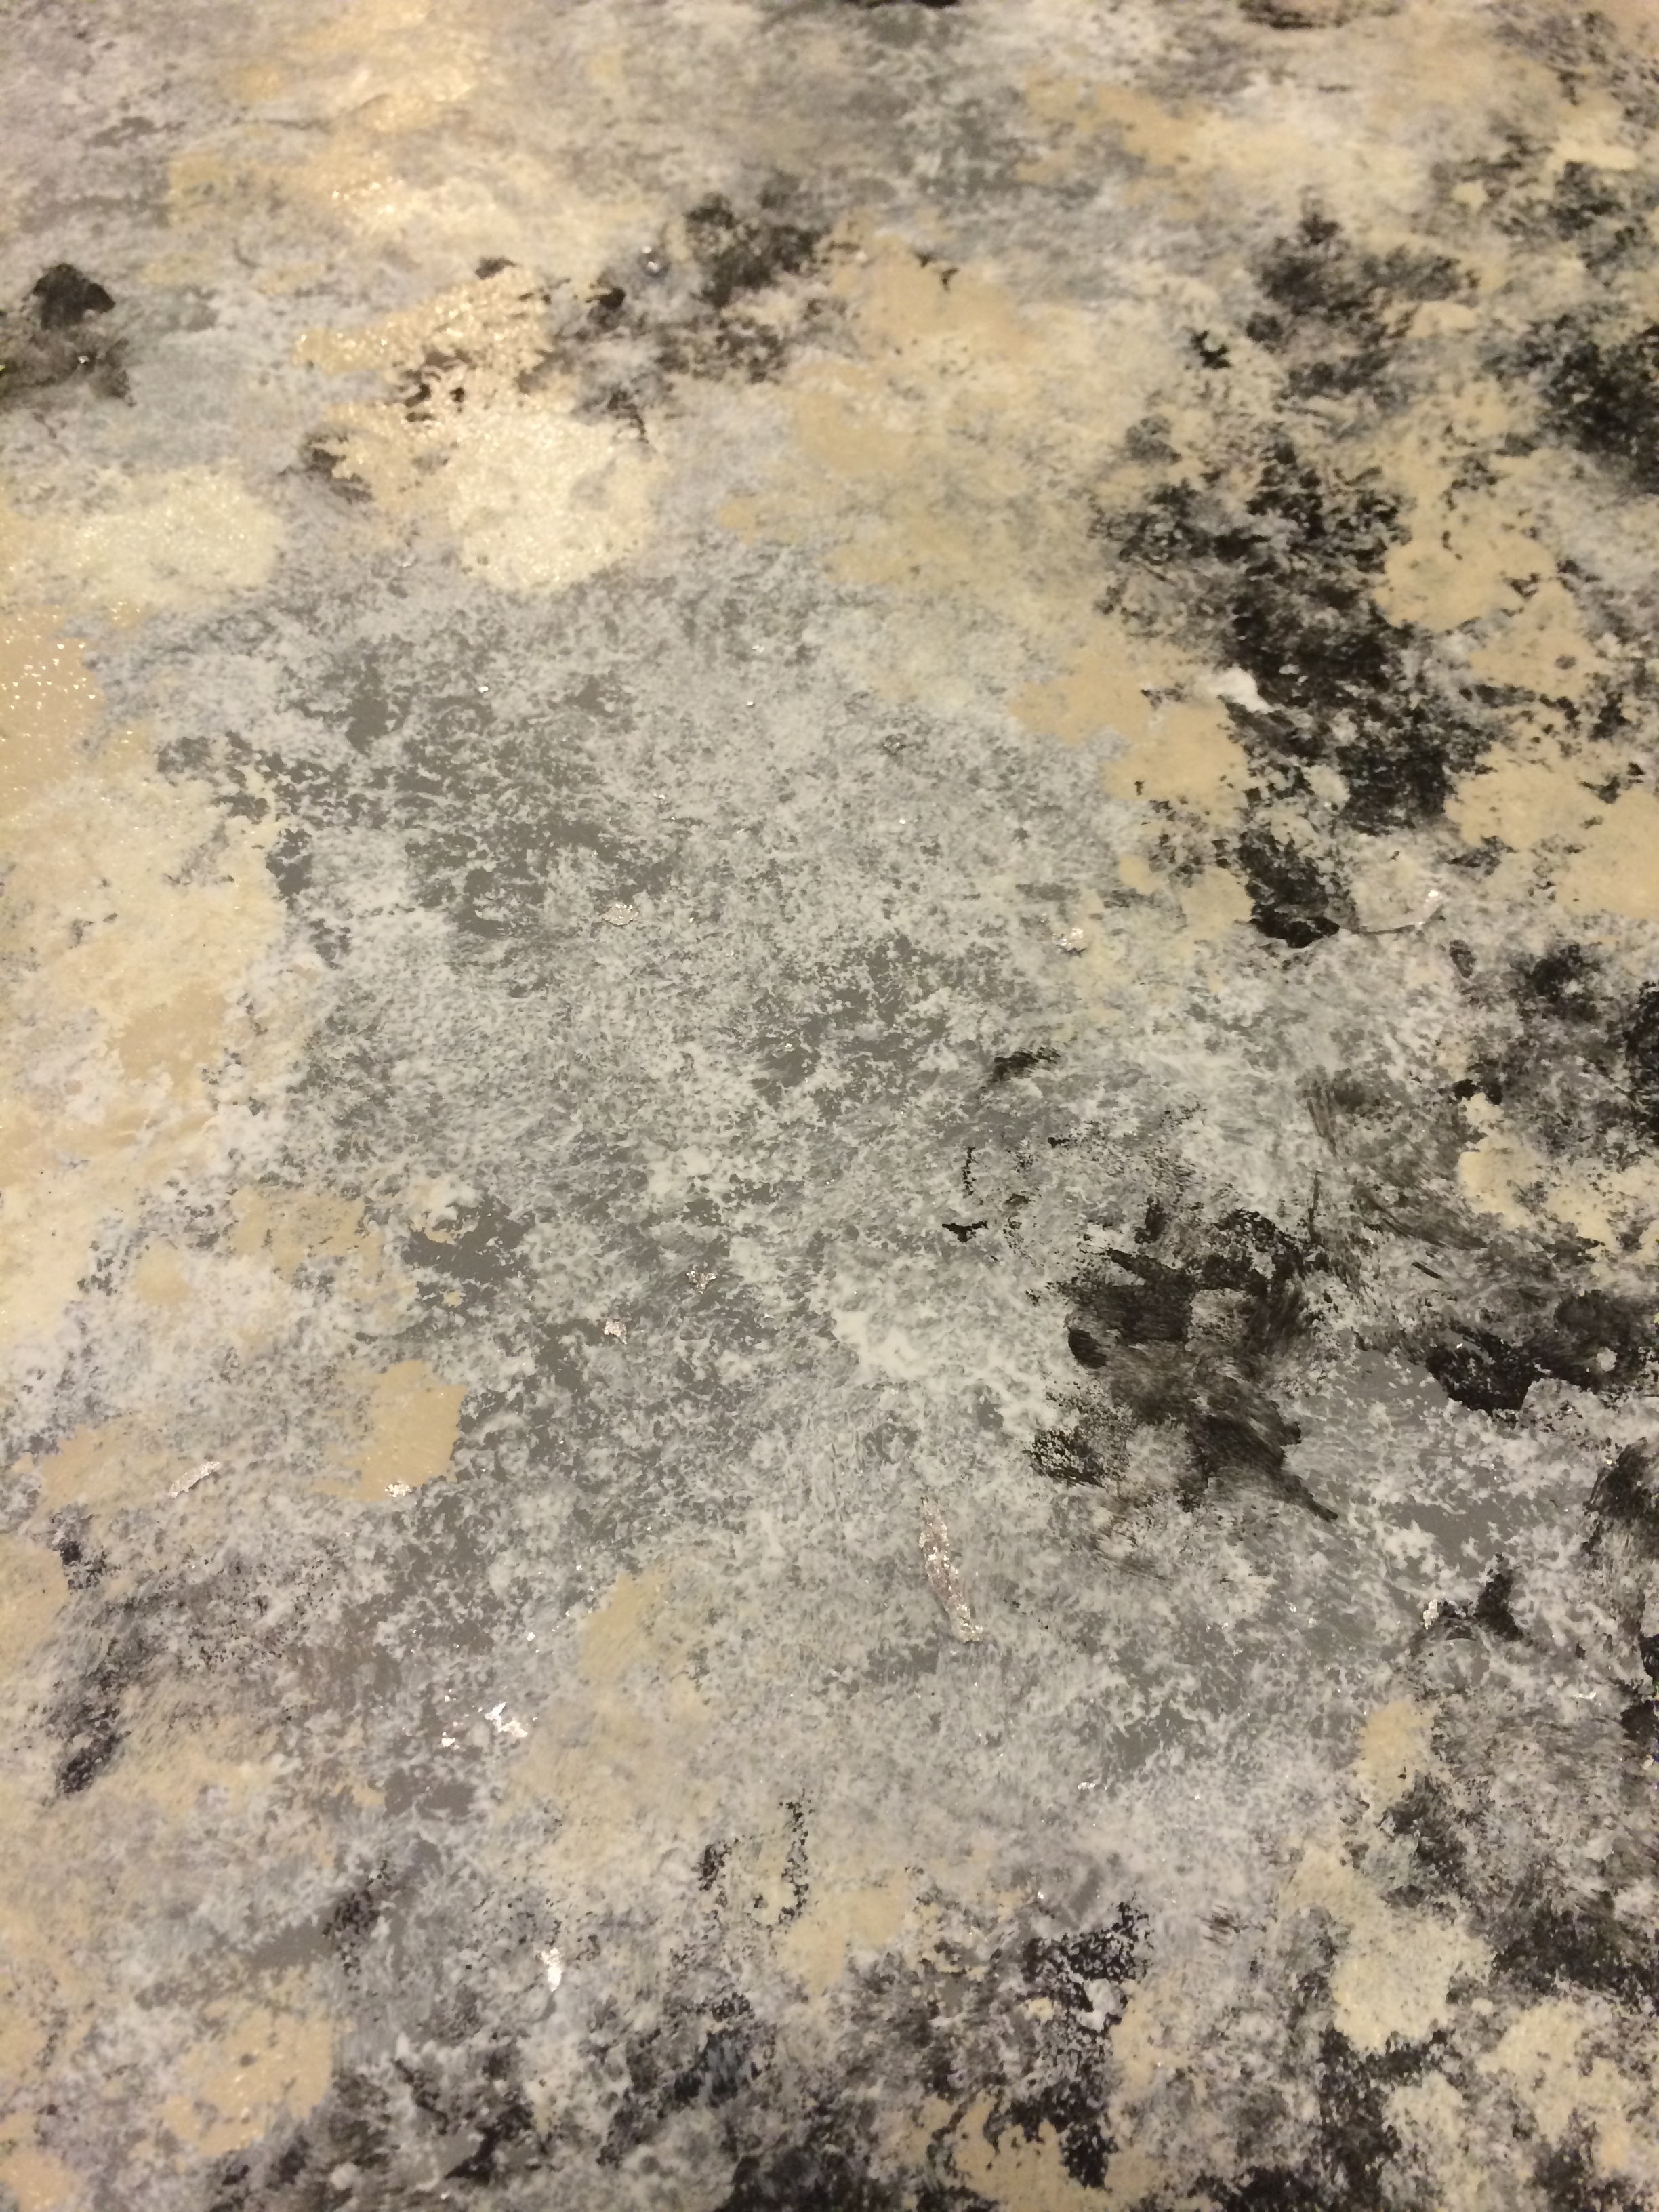
When you pour it on and spread it over the countertop you should see something like THIS:

Incredible, right?! That’s when we knew we had made the right choice! The hardest thing is not to touch the top while it’s drying. Well, actually, the hardest thing may be pacing around all the countertop edges in your kitchen after you pour and spread the Envirotex to ensure there are no hardening ‘droplets’ on the edges. Remember, you want the Envirotex to drip over the sides of the countertops because A: this is how it self-levels and B: you need the edges covered as well. The best tip I can give for the edges is to wait ~5min or more until the coating starts to feel tacky and slightly hardened, then go back over the edges with your plastic spreader tool. If you do this too early you’ll have to make a second and possibly third trip around the countertops to ensure you got all the drips, but I promise the end result is worth ALL this work.
Now, remember when I walked you through the major steps at the beginning of the post and we ended with having PATIENCE?? You have to let the beautiful shiny top coat cure for quite some time… Once again, I read all different advice on the appropriate time to let it cure. In my experience it was dry to touch in 24-48 hours, but I didn’t actually set anything back on the countertops for about a week to ensure it was hardened and leveled. After a week I even set my Kitchen Aid Mixer on the countertops (which is heavy) and had no problems.
I’ve seen plenty of faux granite makeover blogs with black/dark granite as well as some earthy tans but I hadn’t seen a white version yet so if you have any questions on how I got the color I was going for feel free to leave a comment and I’ll get back to you!!
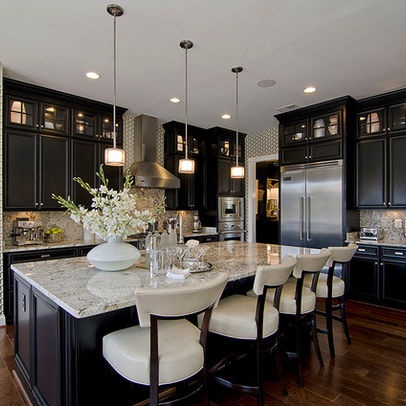
Overall I’m even happier than I could’ve imagined with the result. When I first began this project, I had ideas of white granite to compliment my back cabinets similar to these pins:


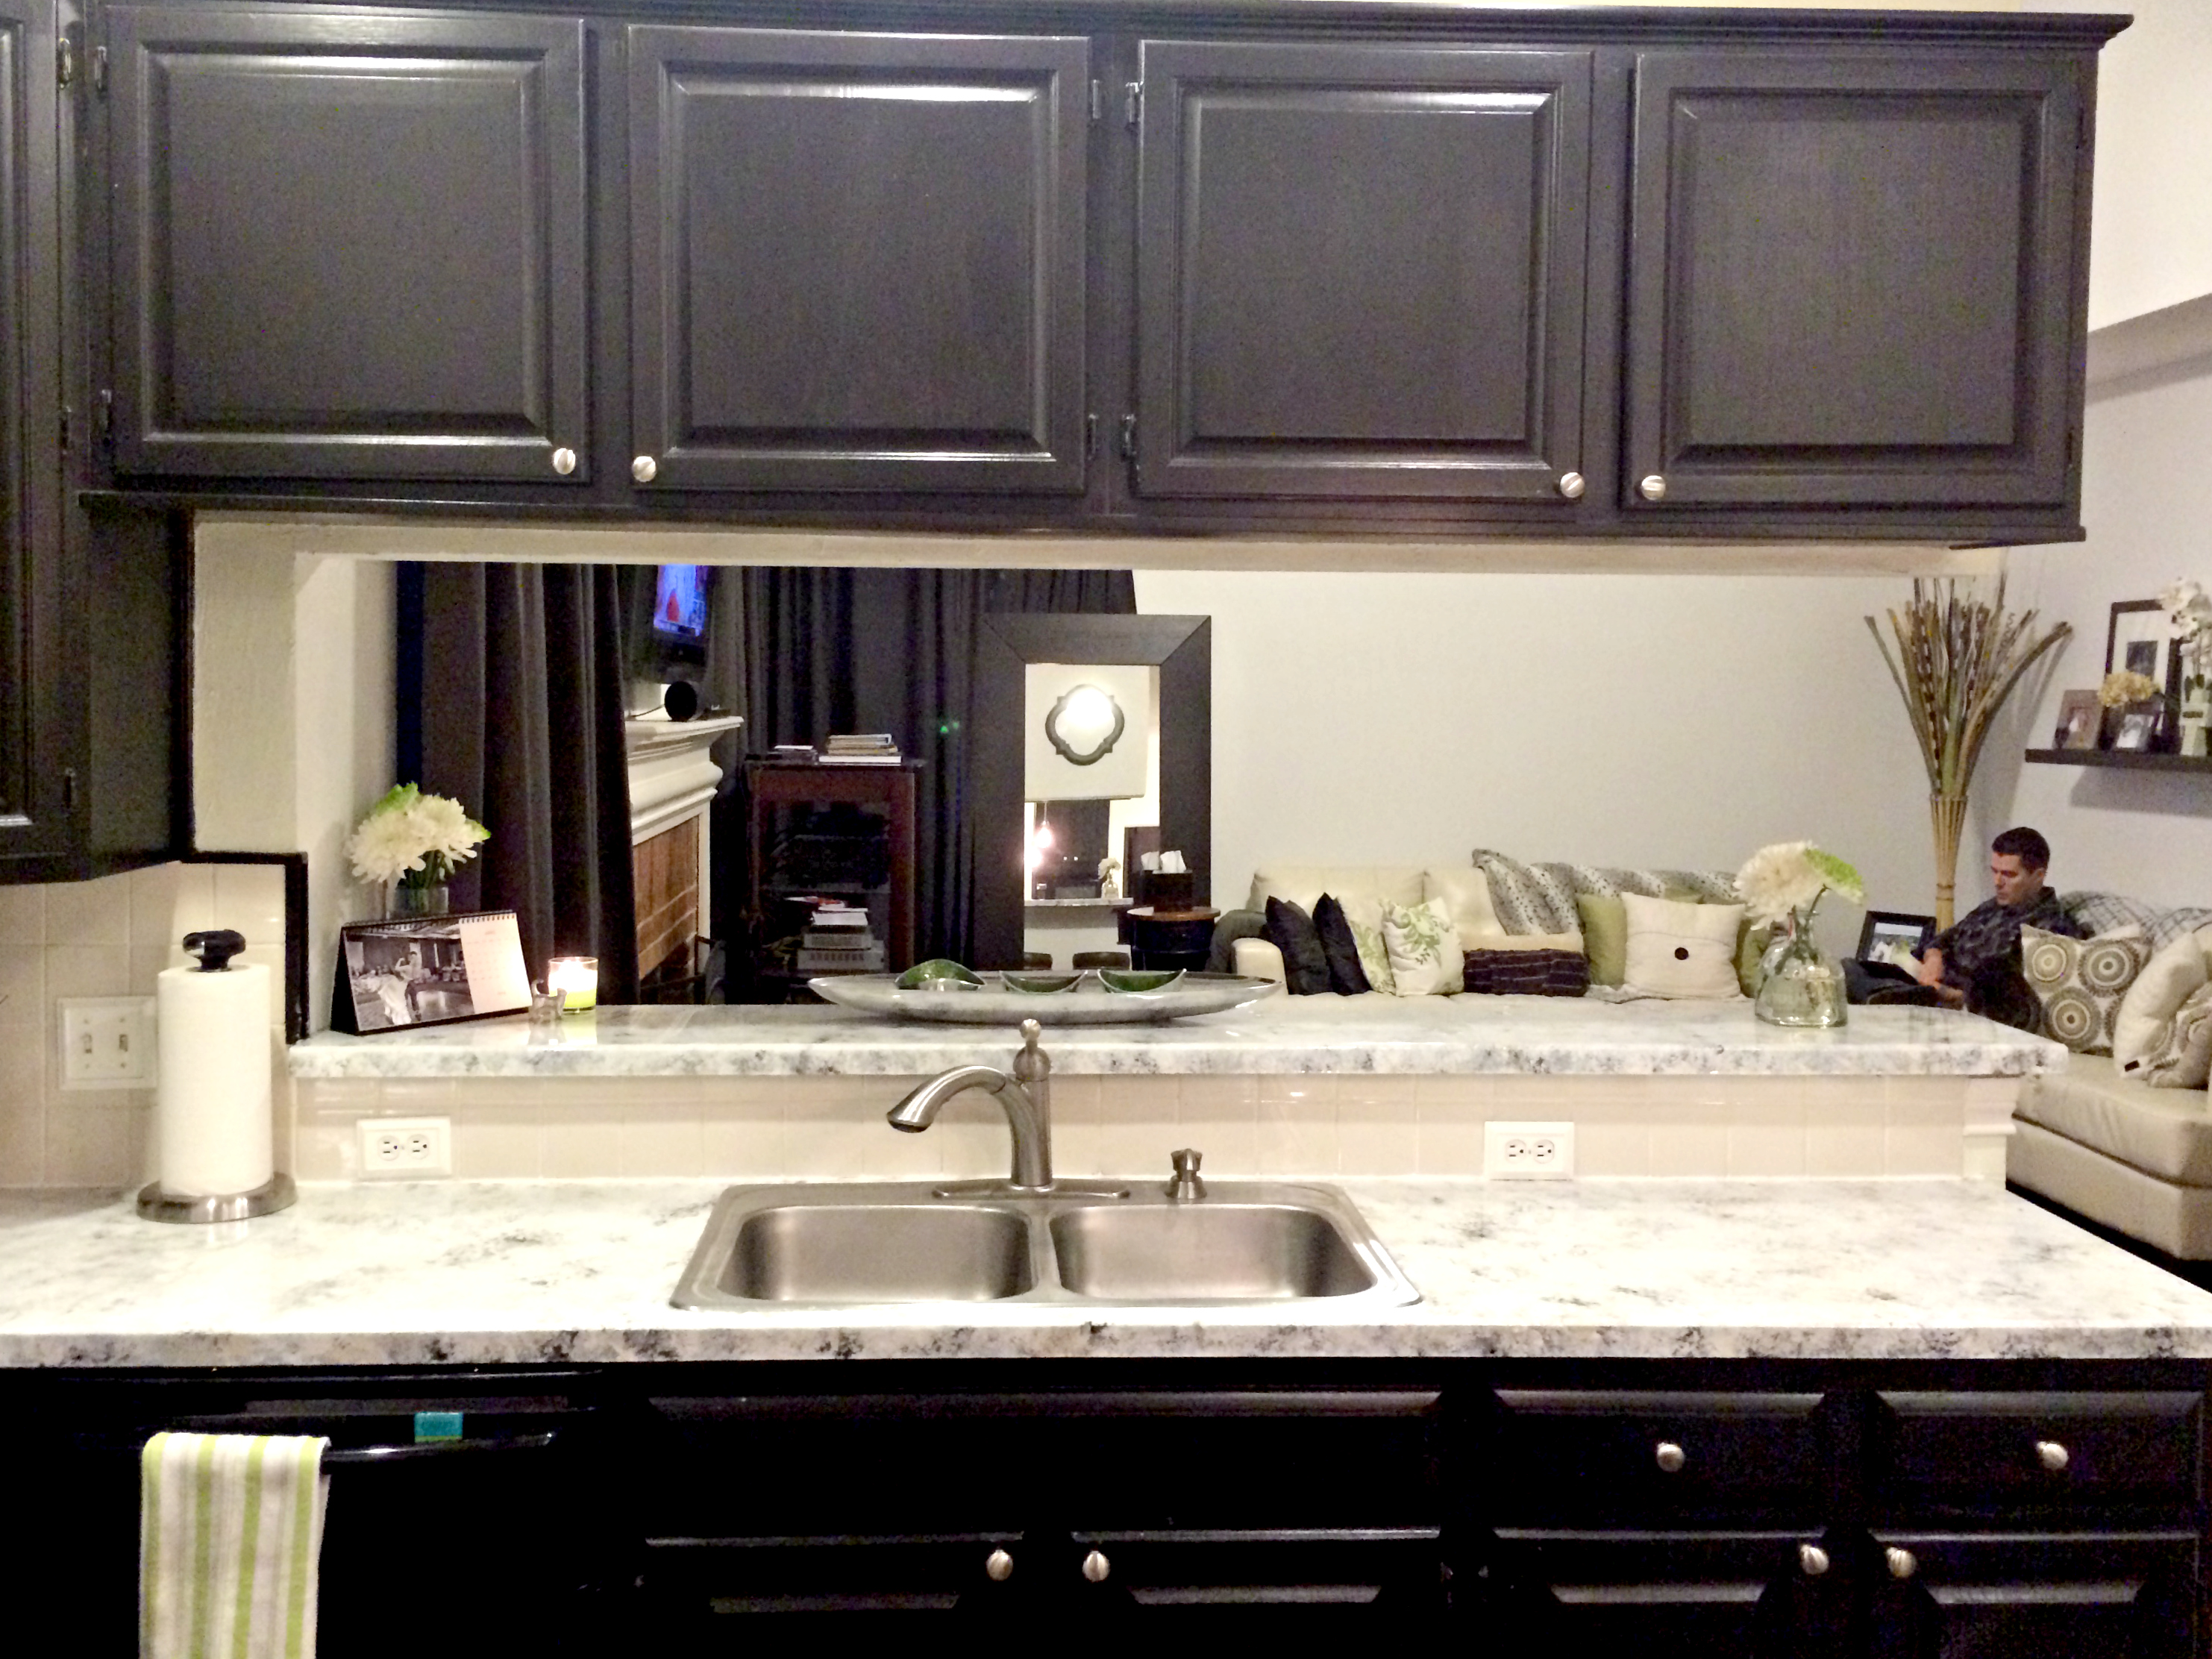
And I ended up with this:


And just to remind you of the difference it made in the total transformation of our kitchen!


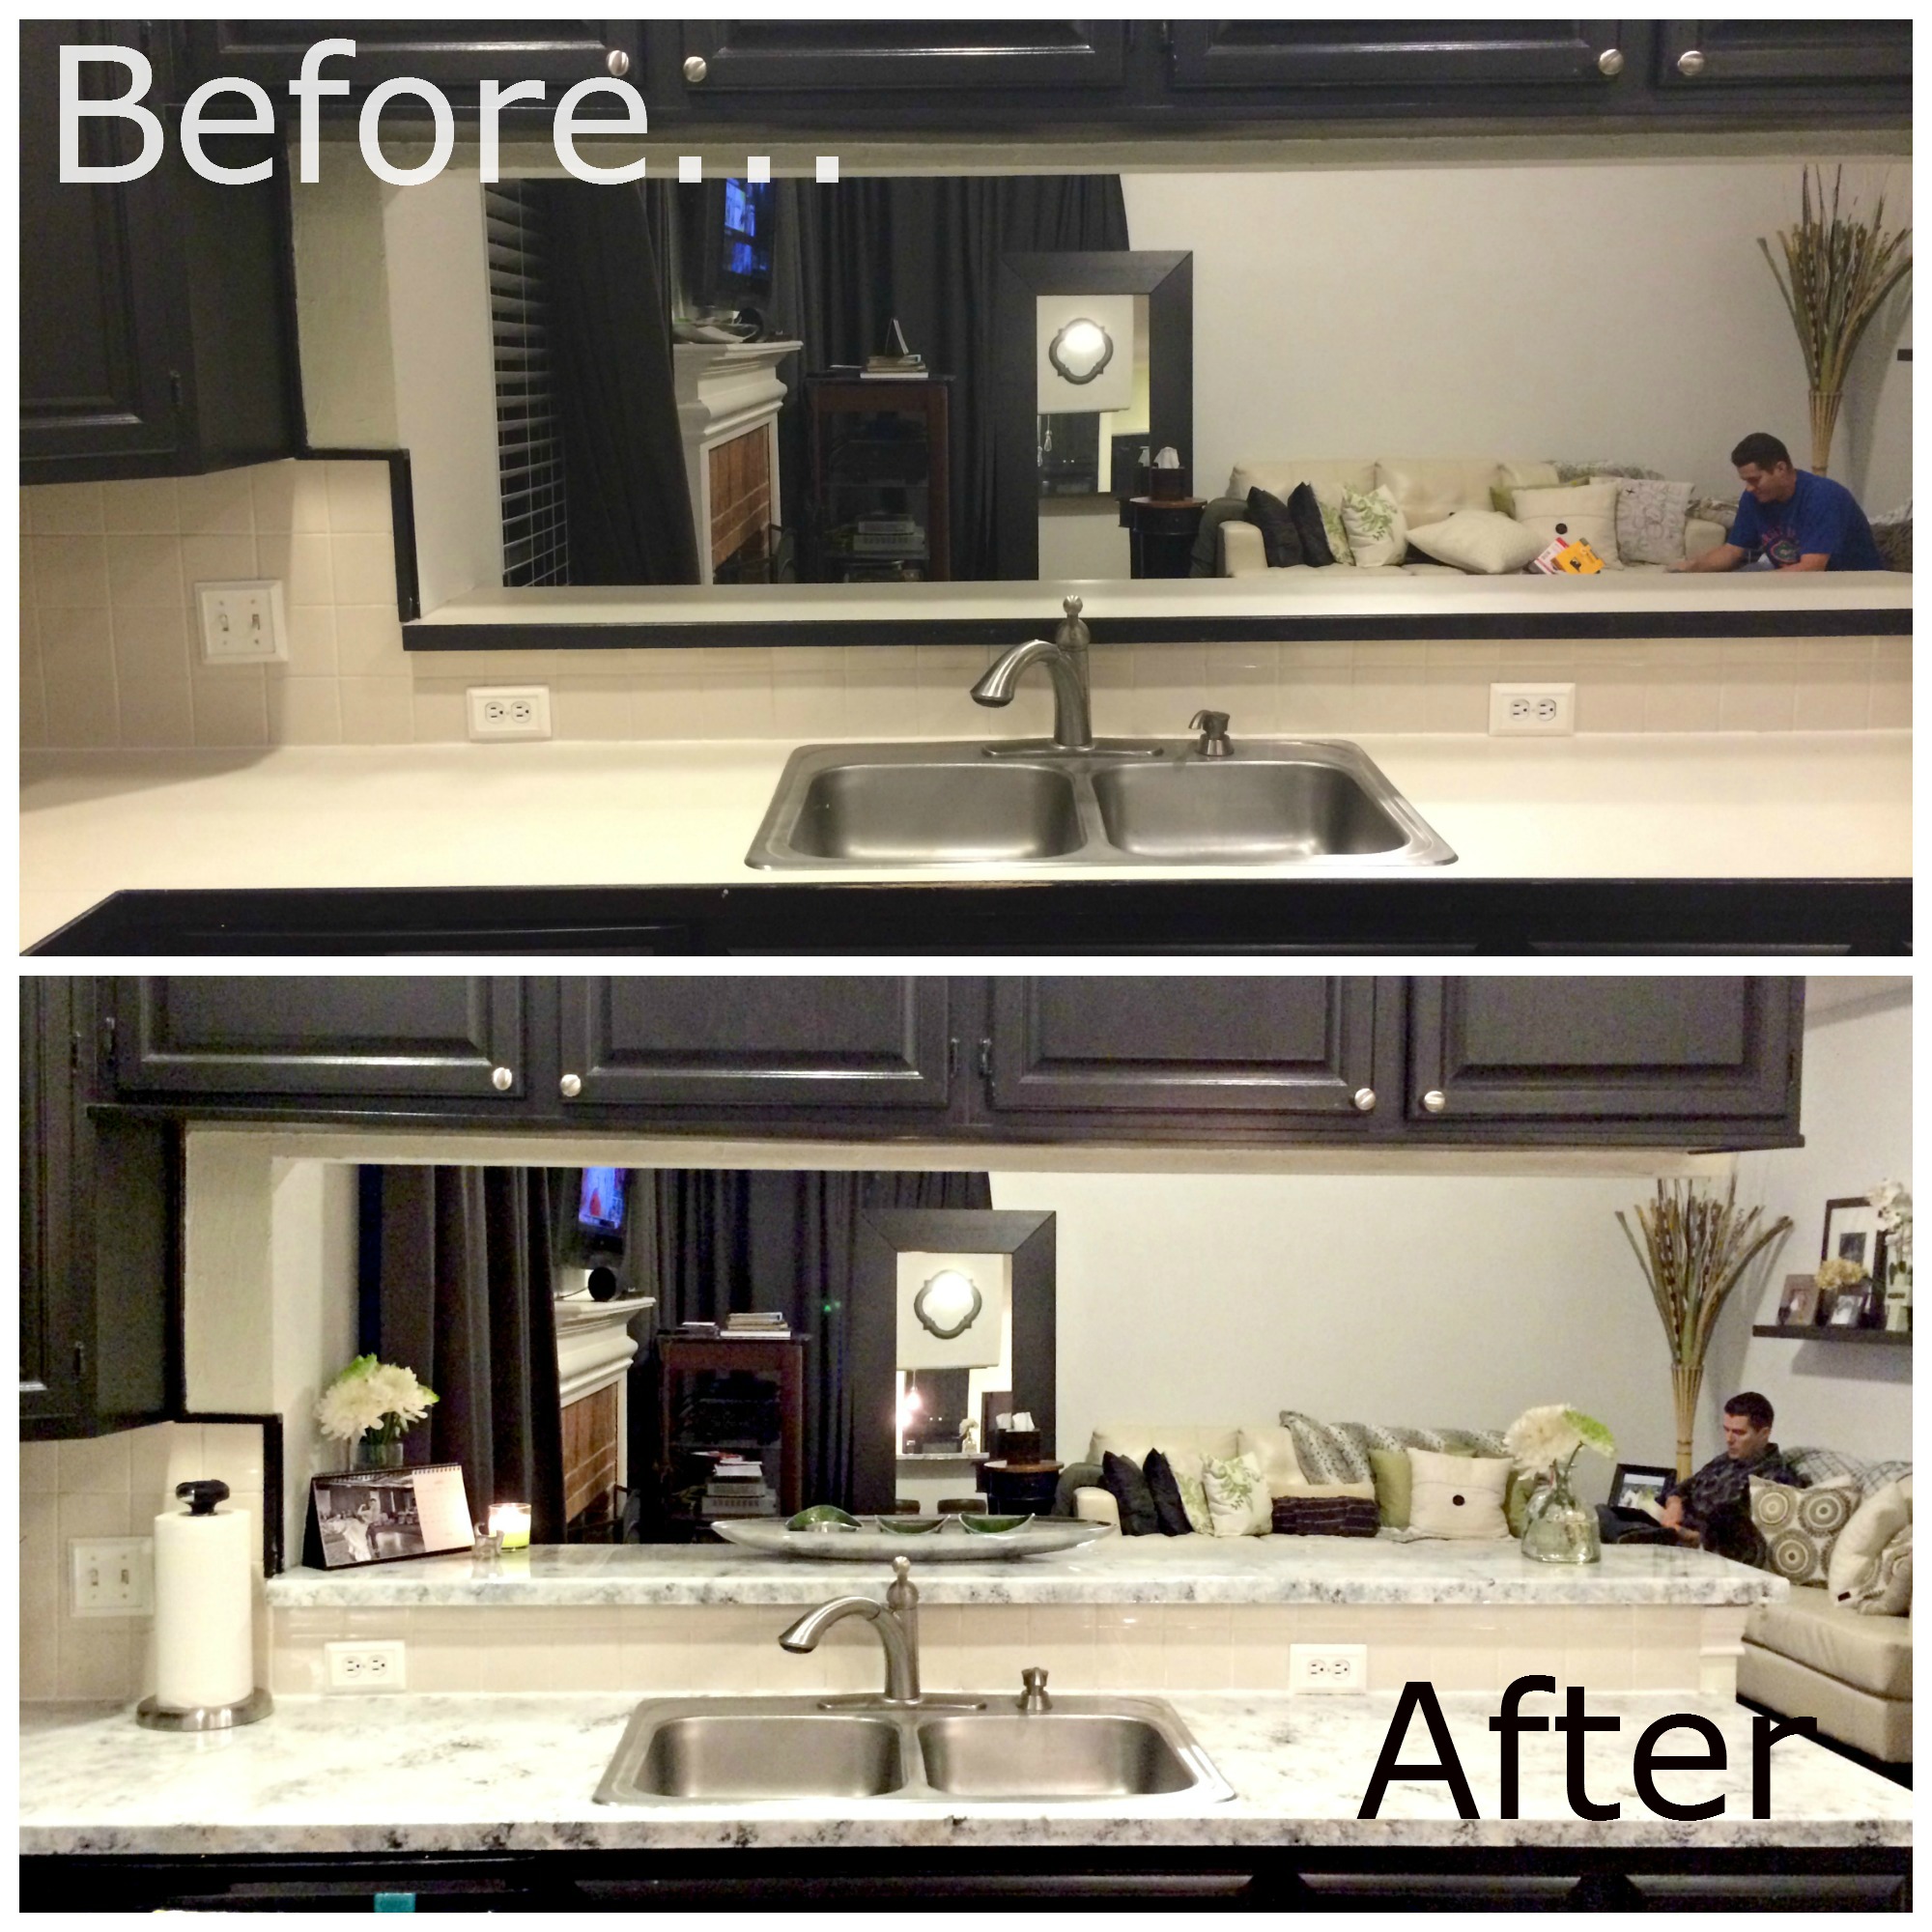
**Update: We’ve lived with these countertops for four months now and no sign of wear and tear! They wipe down great with a simple Clorox disinfecting wipe, way easier to maintain than the sucky laminate we had before.
**Update: 2 years later – see what they look like NOW here.
I’ve shared a lot in this post, but I want to hear from you!
So tell me…. after reading all this, would you try faux granite tops yourself?!
In your dream kitchen, what type of countertops would you pick if cost wasn’t an issue??
What’s the biggest remodel you’ve tackled in your house so far?
xo

<a href=”http://www.bloglovin.com/blog/12697425/?claim=t6z7k2be5pp”>Follow my blog with Bloglovin</a>

Hi Brittany! If I may ask, when you did the coffee bar- you have the backsplash area as well. How did you apply the Envirotext to that area for it to cover/level?! Thank you so much! After reading your post, I’ve finally convinced my husband to let me go hog wild on this DIY!
Hi Brittany! If I may ask, how did you tackle the Envirotex on the coffee bar area backsplash? We’ve got laminate counters with the 3″ backsplash that we won’t be able to remove. Curious how you applied the Envirotext to cover that vertical area and to level? Thank you so much!!
It won’t level the same as a flat surface but we did ours before the flat surface so the excess dripping from the backsplash could just be used on the countertop area. I had luck using a 1.5″ foam brush to help spread it on the backsplash! It isn’t as thick a coat but it made it shiny and protected.
We looooooved how ours turned out- absolutely beautiful! You have created a wonderful tutorial for others to follow. Our counter makeover for $109 was worth every penny! Thanks again!!
So happy to hear!! Congrats I hope you enjoy it for years! Remember if you ever get a stubborn stain try a Magic Eraser sponge, it has saved me each time 🙂
I want to thank you very sincerely for taking the time to document this project in such glorious, helpful detail from soup to nuts, as my grandma used to say, and to compliment you on the clarity with which you organized and imparted all of the relevant info. Really, really great job and so much appreciated – you managed to explain everything in an entertaining way without any unnecessary fat on it (I absolutely hate trying to pick through unnecessary babble for the pertinent goodies). It’s as if you anticipated every question someome might have during the process and answered it in a way that’s easy to understand. As far as I’m concerned, this post is the absolute authority and final word on how to DIY professional quality faux granite and I can’t wait to get started on my own. You kick a lot of butt!!! Thank you again!!!
Thank you! This was the most meaningful comment I’ve received to date. I tried to focus on what I wanted to know when I was first researching the project – I’m happy it has been helpful to others!
Good luck and let me know if you run into questions along the way!
We’re going to be doing this. But, what are metallic leaves? I seriously don’t know? I google I’m I’m getting metallic leaf glitter…. more like confetti shaped like leaves? So what exactly is it?!? Help!! 😆
Little flakes of metal very thin! See if this link helps https://www.google.com/search?q=metallic+leaf&sa=X&biw=375&bih=559&tbs=vw:g,ss:44&tbm=shop&prmd=sivn&srpd=1790960543006720073&prds=epd:1156963357803058598,paur:ClkAsKraXxmG5xX4HVbA23STx_MurTKXUsjfqIRRyXUBaD2CBIZ4xapY42HaO13UAzgIFBFB83jBccEv46q0M0xCoD-6v5Kqvlma8eI65JMbvNER7AVBWbE6NxIZAFPVH70cBP849oeF3pkGwDzXZ0Az6Qm8iw,cdl:1,cid:9007524433781571943&ved=0ahUKEwjs493VttrWAhVq04MKHZkXDlYQgTYI5QQ
Moving into a home next month that has a counter that will be my office that’s rather ugly….can’t wait to try this !!! Thank you so much for sharing I and so many appreciate you !!!
Cynthia
Your bathroom turned out great!! Congrats!
Did you build a temporary dam around the cooktop or just put painter’s tape around the edge? I have a cooktop too and am concerned the Envirotex will run over the top of it.
Hi Cindy, I used painters tape to create a mini wall around the cooktop then removed the tape when the Envirotex was tacky but not all the way dry!
Thank you!
Hello,
I must say this is the best tutorial on how to diy faux granite. Very pretty. Can you list the order you applied the craft paints to achieve this look? Also did you use the glitter? Thanks for your help!!!
Sorry for the late response… I had A baby last year and it kept me from the blog just catching up now!!
In case someone else needs this clarification also… I did a layer of white and silver all over the primer, let dry, then accents (dark grey, light beige, black) in sponge painted areas of interest, then another white/silver layer only leaving the other colors peeking through in “veins” or ribbons.
Did you do your countertop?? I’d love if you would send photos I’m thinking of sharing a post with everyone’s results as a fun follow on!! Brittany-wells@sbcglobal.net
What a beautiful job you did! I’m curious as to how or more so when you poured the Envirotec on the raised breakfast bar area since you need to let it drip over the edge which kind of overhangs the lower countertop?( I hope my question makes sense) Did you pour the breakfast bar area first, let it cure a while and then do the countertop?
Sorry for the late response… I had A baby last year and it kept me from the blog just catching up now!! In case others need the same answer – I used a sponge brush to apply it to the edges. I did The sides first and then the countertop, don’t wait too long though you want any side drippings to blend with the countertop layer.
Did you go for it?? I’d love if you would send photos I’m thinking of sharing a post with everyone’s results as a fun follow on!! Brittany-wells@sbcglobal.net
Hi Brittany, I have just one question. On your “first layer/coat” did you mix the white and the metallic silver together? Or do them seperately?
I had The silver and white next to each other on a paper plate and would dip the sponge in getting some of each color on the sponge – they would naturally mix a little but when it started looking too blended I’d wash and dry the sponge because I liked the contrast! Hope that helps!
Thanks, getting ready to start my countertops today!
Did you go for it??
I’d love if you would send photos I’m thinking of sharing a post with everyone’s results as a fun follow on!! Brittany-wells@sbcglobal.net
You have inspired me to “go ahead”. Great detail thanks. Kitt
Sorry for the late response… I had A baby last year and it kept me from the blog just catching up now!! I’d love if you would send photos I’m thinking of sharing a post with everyone’s results as a fun follow on!! Brittany-wells@sbcglobal.net
Thank you for all the details…I am going to start small…in my bathroom. I love the black and white…Just what I was looking for in my black and white bathroom. Saving this so I can follow it and watch all the videos.
Sorry for the late response… I had A baby last year and it kept me from the blog just catching up now!! I’d love if you would send photos I’m thinking of sharing a post with everyone’s results as a fun follow on!! Brittany-wells@sbcglobal.net
I followed your directions and did it!! I’d love to post photos here so that others will know it works great!! I love them!!
Thank you so much!!!
Sorry for the late response… I had A baby last year and it kept me from the blog just catching up now!! I’d love if you would send photos I’m thinking of sharing a post with everyone’s results as a fun follow on!! Brittany-wells@sbcglobal.net
Hi there. This looks like exactly what I want. My question is… I just painted my bathroom cabinets with charcoal grey chalk paint. Would this work as a primer for my laminate countertop? Thank you. Fantastic job!
I’m not sure if that works on laminate? The primer is important as it ensures durability and that the other layers adhere well!
Love your counters. Some sites I’ve read suggest using a glaze with the paint. And some people like latex paint but most go with acrylic. I’m ready to do this but wonder your take on glaze. Since you did this a few years ago, are there new products you would recommend that weren’t available when you did your project. Thank you for any tips!
Personally I’m comfortable with acrylics and sponging so I’d stick to that but if you’ve worked with the glaze before go for it!! I will Say the final Envirotex layer is incredibly durable and worth it!
Beautiful job! I saw in the supply list where it calls for fine glitter, but I don’t see where in the application process where you used it. Can you explain that part for me?
Sorry for the late response… I had A baby last year and it kept me from the blog just catching up now!! I sprinkled Lightly when the last paint layer was still wet – focused on the “deep” areas where the darker colors peak through, then seal with Envirotex!
Great job! They look awesome! Any idea if this could be done on top of actual granite counter tops? I really don’t like the color of mine and was wondering how I could lighten or change without the high cost of replacing the granite!!
Hmmm I’d research if there is a primer that covers granite but I’d warn that this would devalue your granite – perhaps you can sell the granite and install cheap counters to do this on??
Just spent about $5000 on granite countertops (I love them!), and came across this post today. I don’t know if I would’ve had the guts to tackle my own, but you and your hubs did an outstanding job and your countertops look gorgeous! Maybe I can try this on a different project!
Thank you for the kind kind words!!! I’m sure your real granite is GORGEOUS. But def keep in mind for smaller projects you have or tell a friend!
These are gorgeous!!!!! What are the exact acrylic colors??? And did I miss when to add the glitter??
I have a white primer. I guess I need to buy a gray instead???
Sorry for the late response… I had A baby last year and it kept me from the blog just catching up now!!
1. Acrylics… I used Mainly silver and white (pic of brand in the blog post) and smaller accents were light beige, dark grey and black. I recommend Printing a photo of granite you like and taking it to the craft store!
2. Add glitter when final pain layer is still wet, before the Envirotex
3. You can use white primer! I wanted A darker base layer for depth.
I followed the tutorial for our counters and spent about $60 I Wasn’t comfortable doing the pour over too so I bought a clear coat that was recommended on other similar blogs but followed all the painting tips and I LOVE our counters! Everyone is wo surprised when I tell them there painted… with craft paint!
I’m so happy to hear this!!! Hope you are loving them still!! Feel free to share before and after if you’d like, I’m thinking of doing a follow on post showing others’ results!! Brittany-wells@sbcglobal.net
I’ve sponge painted before but I’m scared to do the countertops like this. Trying to sell for best profit. Thought of the stuff that sells in stores. Any advice to relinquish my fears? How much for entire project?
Mine was around $300 total but I have A lot of countertop area AND I overbought (didn’t want to run out) plenty have commented saying they spent barely over $100! Check out Michael’s (the craft store) coupon for 40% off one item to get Envirotex cheap! I’ve had many contractors in my house to fix one thing or the next ALL fooled by my countertops 😉 so I say It’s worth it!
Thank you so much for this post/tutorial! Yours was the post that finally gave me the courage to go for it! We finished pouring the envirotex lite 4 hours ago and they look AMAZING!!
Our laminate was red. RED! Like a stop sign! Now they are a beautiful neutral with a rainbow of browns, creams, and white.
I really wish I could post before and after here, but you’ll just have to trust me when I tell you, the results are DRAMATIC!
Love it!!
I can’t thank you enough for this post!!! Thank you. Thank you! THANK YOU!!!
Ahhhhhhh I’m so excited to read this!!!! I havent Been on in a while (having a baby will do that I guess!) feel free to send pics if you still want to share I can Post here for reference so others get the courage as well 🙂 Brittany-wells@sbcglobal.net
What type of primer did you use and what color acrylic paints did you use to give it that effect?
This is the type of Primer we used http://m.homedepot.com/p/Zinsser-1-gal-White-Bulls-Eye-1-2-3-Water-Based-Interior-Exterior-Primer-and-Sealer-2001/100398391?N=5yc1vZbt0t&AID=11210757&PID=3662453&SID=skim725X175Xc2620fc951f9e7d3baced438254f8630&cm_mmc=CJ-_-3662453-_-11210757&cj=true and we just had them tint it gray. You don’t need oil based Acryllics, I just used the kind from the local craft store shown in the photos 🙂 I used Mostly white and silver with accents in light beige, dark grey and black. The Envirotex seals over everything! Let me know if you have any more questions
When do you add the glitter?
Just before the final layer – the Envirotex!!
How has it help up to heat as far a candles and crockpots?
Hi Amy! I havent Tested it directly with heat… I use A trivet for hot dishes or a dish towel or just set them on the stove… I use A crock pot often that has small legs and no issues whatsoever!!!
Can you tell me exactly which colors u used and in what order? I love your colors. It’s exactly what I’ve been looking for!
I’m do sorry I no Longer have the paints! There’s a photo of the white and silver I used In the blog post… the smaller accent colors were a very light beige and a dark grey and a black… you could print a color of granite you like online and take it to the craft store to choose your colors!!
I am TERRIFIED to start this project, but thanks to your tutorial, at least I have very clear steps with recommended products. I feel a bit more confident…just a bit.
Hi Tara!! I hope you took the leap and did it! Would love to see your end result 🙂 feel free to share with me Brittany-wells@sbcglobal.net or let me know if you have questions!
Hi, Brittany. Your tutorial is as amazing as your counter-tops! I had just one question. How did you approach the sink during the epoxy phase? I can’t decide whether to take my sink out, put the epoxy down, and then caulk the sink – or simply tape around the sink. Any guidance would be greatly appreciated. Thanks!
Firstly THANK YOU SO MUCH for the kind words!! Hello! Sorry this is a late reply I’m not a professional blogger – I opted To leave my sink in to keep the project simple and knowing that I ultimately want to replace the sink so it was low risk if anything happened to it. My old sink is still kicking though 😉 I used A “tape wall” to protect my sink edge from the Envirotex. I removed Tape when the Envirotex was tacky but still not fully cured! So if you touch it it would feel tacky but it won’t run when you remove the tape. It’s ultimately up to you if you want to tackle sink removal!! That would probably be the more professional way to handle it 🙂
At what point did you remove the taping especially where your counter and back wall come together. I’m in the painting process right now. 😁
Hello! Sorry this is a late reply I’m not a professional blogger – I removed Tape when the Envirotex was tacky but still not fully cured! So if you touch it it would feel tacky but it won’t run when you remove the tape.
You have given me great hope to change my counter tops!!! They are dark but shiny. I prefer I light colors. Your counters are beautiful!!
Thank you so much! Yes I still Love mind they brought so much change for minimal cost! Good luck I’d love to see your finished product
Thanks so much for all the detailed information. I’ve wanted granite but it’s not in the budget. I am definitely gonna try your method. Your counters look amazing and no one would ever know you did them yourself. You go girl!!! Thanks again, Tammy
Good luck Tammy!! And thank you!! I’d love to hear how it goes if you try it out 🙂
Hello, loved your countertop. One question- does it get scratched easily? How’s the surface looking after a few years? Much appreciate your reply.
I did an update post a few years ago and it’s still true today! I still have the same countertop and am happy with it. I don’t have a lot of scratches, I don’t cut directly on them I use cutting boards and I don’t set hot pans down without a pad or trivet underneath but other than that we use the heck out of them and they’ve held up!!! https://everythingsbetterwithsparkles.wordpress.com/2016/04/30/update-diy-was-it-worth-it-faux-granite/
Is the primer a flat primer or a shiny primer? This is gorgeous! And do you shred the leave or do you put the entire piece on and then cover it with paint?
Hi Tammy! It was a flat primer you end up covering the primer with other paint so it’s really just to ensure the paints have a good surface to adhere to. The metallic leaf flakes off in pieces it’s pretty delicate – I just Used pieces!
Hi, I’m going to be putting in an island and wanted to try your idea. What were the original counters made of that you used?
Hi! I cant Be 100% sure since they were here when we moved in but I believe they were Formica – good luck!!
You did an excellent job! This is one of the best Granite looks I have seen. Thank you for the step by step instructions. I’m doing my bathroom counter first to try it, then my kitchen counters.
Good luck! I hope They turn out amazingly!
i painted a faux white marble countertop, topped it with another expoxy sealer, in the beginning it was absolutely stunning! you could not tell it wasn’t real marble, but after a few weeks it started to yellow and as time went on it yellowed more. I was devastated! have you had this problem?
I have Not had any yellowing I’m sorry that you did! What brand did you use?
Brittany, I’m so impressed with your instructions that I’m going to take my own countertops in the same way. I did freak a little when I read about your husband helping with the Envirtex application. Do you think this is something I can do alone… no husband… no helper… ?
Yes you could but I’d call in a friend if you have the option it’s less stressful time wise having one person mix and one pour/spread!!